Radio Button Tool
![]() Radio Buttons allow readers to select one option from a set of mutually exclusive choices. Radio Buttons always appear in groups of two or more. Only one button in the group may be selected at a time. A Radio Button consists of a small circle and descriptive caption. A dot appears in the circle of the button that is selected. The absence of a dot indicates that the button is not selected. Radio Buttons often are used on forms or tests when readers must make a single selection from multiple choices.
Radio Buttons allow readers to select one option from a set of mutually exclusive choices. Radio Buttons always appear in groups of two or more. Only one button in the group may be selected at a time. A Radio Button consists of a small circle and descriptive caption. A dot appears in the circle of the button that is selected. The absence of a dot indicates that the button is not selected. Radio Buttons often are used on forms or tests when readers must make a single selection from multiple choices.
To create a Radio Button, use the mouse to draw a rectangle where you would like the button to appear. The Radio Button Properties screen will be displayed, allowing you to define the button’s appearance and behavior.

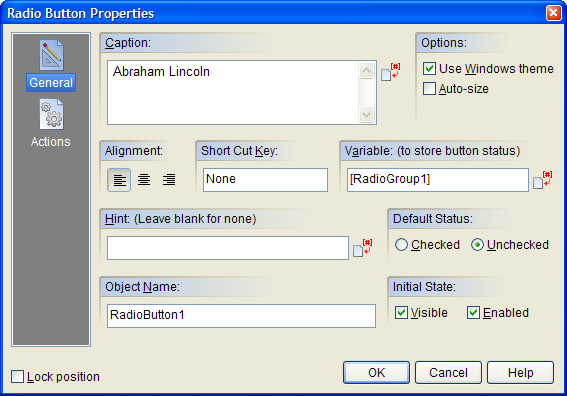
The Radio Button Properties screen is divided into two sections indicated by the icon images on the left: General and Actions. To view the settings for a section, click the corresponding icon.
General
Text entered into the Caption field will appear beside the Radio Button. The caption should give the reader some indication of the selection associated with each button.
Enabling the Use Windows theme option will display the Radio Button using the Windows XP/Vista style. This feature only works when your publication is viewed under Windows XP and Vista. When viewed under older versions of Windows, the Radio Button will be drawn using the normal method.
When the Auto-size option is enabled, the object will automatically adjust its dimensions to match the size of the caption text.
You may set the alignment for the Radio Button using one of the three Alignment buttons: Left Aligned, Centered or Right Aligned. The alignment affects how the Radio Button is positioned relative to its caption.
In order to keep track of the status of a group of Radio Buttons while your publication is running, you will need to assign each button in the group the same variable name. However, no two groups in a publication should share the same variable. The variable name tells VisualNEO Win which Radio Buttons belong to a group.
VisualNEO Win will automatically group Radio Buttons created on the same page with a generic variable name based on the page number (such as [RadioGroup1]). If you need more than one group per page, you will need to manually change the variable name of the other groups by modifying the Variable (to store button status) field. At runtime, the group variable will contain the caption of selected Radio Button. You can determine which button is selected using simple Action Commands. For example:

In this example, clicking the OK button executes the following Action Commands, which provide feedback about the reader’s choice:
If "[RadioGroup1]" "=" "Portland"
AlertBox "Sorry" "That’s not the right answer."
EndIf
If "[RadioGroup1]" "=" "Salem"
AlertBox "Good Job" "That’s correct!"
EndIf
If "[RadioGroup1]" "=" "Eugene"
AlertBox "Sorry" "That’s not the right answer."
EndIf
If "[RadioGroup1]" "=" ""
AlertBox "Whoops" "You forgot to select an answer."
EndIf
You can check an individual Radio Button programmatically while your publication is running using the SetVar Action. To select the second item in the above example, insert that button’s caption into the group’s variable:
SetVar "[RadioGroup1]" "Salem"
Similarly, you can reset a Radio Button group so that none of the buttons are selected by clearing the group’s variable like this:
SetVar "[RadioGroup1]" ""
For more information about using variables and Action commands, click here.
You may specify that a Radio Button start out Checked or Unchecked by selecting the appropriate Default Status option. When your publication starts, the Radio Button will be initialized to this state. Since each item in a Radio Button group is mutually exclusive, only one button in a group should be initially checked. For multiple choice tests, none of the buttons should start out checked, unless you want your readers to know the answers in advance.
Actions
Radio Buttons support the following Action Events: Click, Mouse Enter and Mouse Exit. Click the appropriate tab at the bottom of the Action Editor to create or edit Actions for the events you want to control. See Understanding Actions and Variables and Action Command Reference for a complete discussion of the Action Editor and Action Commands.