Text Entry Field Tool
![]() VisualNEO Win’s Text Entry Field allows you to provide your readers with a place to enter text or numeric information. Use Text Entry Fields to create fill in the blank forms, record answers to essay questions or collect just about any other type of information. The information may be stored in a variable, used in calculations or written to a file.
VisualNEO Win’s Text Entry Field allows you to provide your readers with a place to enter text or numeric information. Use Text Entry Fields to create fill in the blank forms, record answers to essay questions or collect just about any other type of information. The information may be stored in a variable, used in calculations or written to a file.
To create a Text Entry Field, use the mouse to draw a rectangle where you want the field to appear. The Text Entry Properties screen will be displayed, allowing you to define the field’s appearance and behavior.
The Text Entry Properties screen is divided into three sections indicated by the icon images on the left: General, Style and Actions. To view the settings for a section, click the corresponding icon.
General
In the Text field, enter any text you want to appear in the Text Entry object when your publication first starts. This can be used to represent a default choice, where the user can accept the text already in the object and move on. Most of the time this field will be left blank, since the main purpose of a Text Entry object is to provide a space for readers to enter information of their own.
In order to keep track of the contents of a Text Entry object while your publication is running, you will need to assign the object a unique variable name. VisualNEO Win will automatically assign a variable name that matches the Object Name, but you may change this if you like by modifying the Variable (to store Text Entry contents) field. At runtime, the variable will contain whatever has been typed into the field. You can modify the contents of the Text Entry object by manipulating the variable using a simple Action Command. For example:
SetVar "[TextEntry1]" "Have a nice day!"
Similarly, you can clear the contents of the Text Entry object like this:
SetVar "[TextEntry1]" ""
You may also set the alignment for the Text Entry using one of the three Alignment buttons: Left Aligned, Centered or Right Aligned. The alignment affects how the text typed into the field is displayed.
Style
The options here allow you to control how much and what type of information may be typed into the Text Entry object.
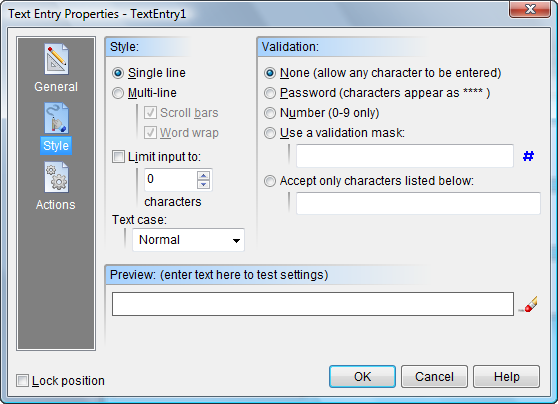
You can limit the Text Entry to a Single line or allow a large block of text to be entered by selecting the Multi-line option. The Word wrap and Scroll bar features also may be enabled for Multi-line fields. You can limit how much text the reader may enter by typing a number into the Limit input to box. Specify 0 (zero) to set the maximum number of characters to 64,000 which is the Windows default.
You can control exactly what type of text may be entered by selecting a Validation method. Select None to allow any character (letters, numbers, punctuation, spaces, etc.) to be entered. Use the Password option to display only asterisks “*” in place of whatever text is entered. This is useful if the field is to serve as a place to enter a secret code or password. Select Number to limit the text entered to numbers (0...9). The Accept only characters listed below option allows you limit input to a specific list of acceptable letters, numbers, etc. The list is case sensitive, so if you want both upper and lower case letters you must include both. You can select Use a validation mask to restrict what the reader can enter to specific characters and formats. Any invalid characters entered by the reader are rejected. You can select some predefined masks by clicking the # button, or compose your own using codes from the table below:
|
L |
Requires that a letter (A-Z or a-z) be entered. |
|
l |
Permits letters (A-Z or a-z) to be entered, but does not require it. |
|
A |
Requires that a letter or number (A-Z, a-z or 0-9) be entered. |
|
a |
Permits letters or numbers (A-Z, a-z or 0-9) to be entered, but does not require it. |
|
C |
Requires that a character be entered, but does not place any limitation on what that character must be. |
|
c |
Permits any character to be entered, but does not require it. |
|
0 |
Requires that a number (0-9) be entered. |
|
9 |
Permits a number (0-9) to be entered, but does not require it. |
|
# |
Permits a number (0-9) or a plus (+) or minus (-) sign to be entered. |
|
: |
Used to separate hours, minutes and seconds. If the computer’s regional settings specify a different character, that character will be used instead. |
|
/ |
Used to separate months, days and years. If the computer’s regional settings specify a different character, that character will be used instead. |
|
_ |
Used to represent spaces. When the reader types in the field, the cursor automatically skips the _ character. |
|
> |
All characters following this symbol will be in uppercase until then end of the mask or a < character is encountered. |
|
< |
All characters following this symbol will be in lowercase until then end of the mask or a > character is encountered. |
|
<> |
These two symbols together turn off case checking. Characters are formatted as entered by the reader. |
|
\ |
The character that follows this symbol is treated as a literal character not a mask code. Use this if you need to insert any of the special characters above into your mask. |
Any character present in the mask but not found in the table above will be interpreted as a literal character. Literal characters will be inserted automatically into the formatted text and the cursor will skip over them during data entry. For example a mask for a telephone number with area code would look like this:
(000)_000-0000
After a telephone number has been entered by the reader, the data stored in the Text Entry object’s variable might look like this:
(123) 456-7890
The Preview shows you what your Text Entry object will look like and can be used to test any masks you create.
Actions
Text Entry Fields support the following Action Events: Text Change, Mouse Enter, Mouse Exit, Gain Focus and Lose Focus. Click the appropriate tab at the bottom of the Action Editor to create or edit Actions for the events you want to control. See Understanding Actions and Variables and Action Command Reference for a complete discussion of the Action Editor and Action Commands.
The Text Change Action is triggered each time a key is pressed while Text Entry object has the input focus. It’s generally not the best place to process data, since the Action may execute many times before the reader finishes entering the requested information. The preferred method is to place a Push Button next to the field for the user to click when the data entry is complete.